用于团队的知识积累、管理
目前有很多开源博客,但是考虑markdown的优势,以及同样基于markdown的gitbook(我们作为开发文档工具使用),最后决定选择在程序员中使用最广的个人博客hexo,如果能使用域名配置gitlab page就不需要配置自动化部署,请直接跳过本文,本文使用环境是在内部网络,gitlab page在没域名下是无法使用的。
以下就从编写markdown博客内容到自动化部署流程

1. 环境说明
3台服务器 ubuntu16.04 docker-18.09.1 (用单台多容器或者虚拟机都可以,按实际资源考虑)
[A]:192.168.4.17 node.js + npm + git + hexo编译构建服务 + nginx博客运行服务
[B]:194.0.19.253 gitlab服务器
[C]:192.168.4.16 jenkins服务器
node.js v10.16.3
npm v6.9.0
hexo v2.0.0
nginx 1.15.8
GitLab 11.8.1-ce
Jenkins 2.168
以下步骤名称尾部都会标注[A] [B] [C] 对应各自的服务器
2. 安装
2.1 Git安装配置 [A]
升级,ubuntu16.04 git默认版本2.7.4
1
2
3
4
$ sudo add-apt-repository ppa:git-core/ppa
$ sudo apt-get update
$ sudo apt-get install git
$ git --version
2.2 hexo搭建 [A]
2.2.1 nodejs+npm
安装
1
2
3
4
5
6
7
8
9
10
11
12
13
14
$ sudo apt-get install nodejs
$ sudo apt install nodejs-legacy
$ sudo apt-get install npm
$ sudo npm config set registry https://registry.npm.taobao.org
#更新node版本
$ sudo npm install n -g
$ sudo n stable
#使用淘宝镜像
$ sudo npm install -g cnpm --registry=https://registry.npm.taobao.org
#查看安装版本
$ sudo node -v
2.2.2 安装hexo
安装
1
2
3
4
$ sudo cnpm install -g hexo-cli
#版本验证
$ hexo -v初始化
1
2
3
$ mkdir ~/hexo && cd ~/hexo
$ sudo hexo init
$ sudo cnpm install安装插件
1
2
3
4
5
6
7
8
9
10
11
12
#git发布插件(必须)
$ sudo cnpm install hexo-deployer-git --save
#rss插件
$ sudo cnpm install hexo-generator-feed --save
#永久链接插件
$ sudo cnpm install hexo-abbrlink --save
#目录
$ sudo cnpm install hexo-toc --save
#流程图插件
$ sudo cnpm install hexo-filter-mermaid-diagrams --save
$ sudo cnpm install hexo-filter-flowchart --save
$ sudo cnpm install hexo-filter-sequence --save配置权限
1
2
3
4
#查看当前用户的UID GID
$ cat /etc/passwd | grep $(whoami)
#授权
$ sudo chown -R $(id -u):$(id -g) ~/hexo运行
1
$ hexo s -g
访问 http://192.168.4.17:4000 看是否正常显示博客,按ctrl+c停止运行
2.3 安装nginx
1 | $ docker run --name nginx -p 4000:4000 \ |
2.4 Jenkins安装 [B]
安装
1
2
3$ docker pull jenkins/jenkins:2.168
$ sudo mkdir /var/local/jenkins
$ sudo chown -R 1000:1000 /var/local/jenkins1
2
3
4
5$ docker run --name=jenkins \
-p 81:8080 -p 50000:50000 \
-v /etc/localtime:/etc/localtime:ro \
-v /var/local/jenkins:/var/jenkins_home \
-d jenkins/jenkins:2.168安装后访问系统 http://192.168.4.16:81 ,从日志中复制填写password,并按引导安装插件,这个密码也是admin管理员的密码,或者在/var/jenkins_home/secrets/initialAdminPassword文件中查看
1
$ docker logs jenkins
注意:一定要安装publish-over-ssh插件,用于SSH连接并发送执行命令
设置时区:系统管理->脚本命令行 执行以下命令即可
System.setProperty(‘org.apache.commons.jelly.tags.fmt.timeZone’, ‘Asia/Shanghai’)
2.5 GitLab安装 [C]
安装
1
2
3
4
5
6
7
8
9
10$ docker pull gitlab/gitlab-ce:11.8.1-ce.0
#使用的都不是常规端口
$ docker run --name gitlab \
-p 11443:443 -p 1180:1180 -p 1122:22 \
-v /etc/localtime:/etc/localtime:ro \
-v /var/local/gitlab/config:/etc/gitlab \
-v /var/local/gitlab/logs:/var/log/gitlab \
-v /var/local/gitlab/data:/var/opt/gitlab \
-d gitlab/gitlab-ce:11.8.1-ce.0配置ssh密钥的端口,端口号与映射的宿主机端口号一致;修改时区
1
$ docker exec -it gitlab vi /etc/gitlab/gitlab.rb
1
2
3
4
5#如果使用常规端口,端口号就不用修改
gitlab_rails['gitlab_shell_ssh_port'] = 1122
external_url 'http://194.0.19.253:1180' #你的实际IP
nginx['listen_port'] = 1180
gitlab_rails['time_zone'] = 'Asia/Shanghai'配置后应用重启
1
2$ docker exec -it gitlab update-permissions
$ docker restart gitlab访问gitlab,第一次需要设置root密码,然后创建用户,再新建一个仓库本地拉取测试是否安装成功
3.自动化部署配置
在服务器A配置: node.js + npm + git + hexo编译构建服务 + nginx博客运行服务
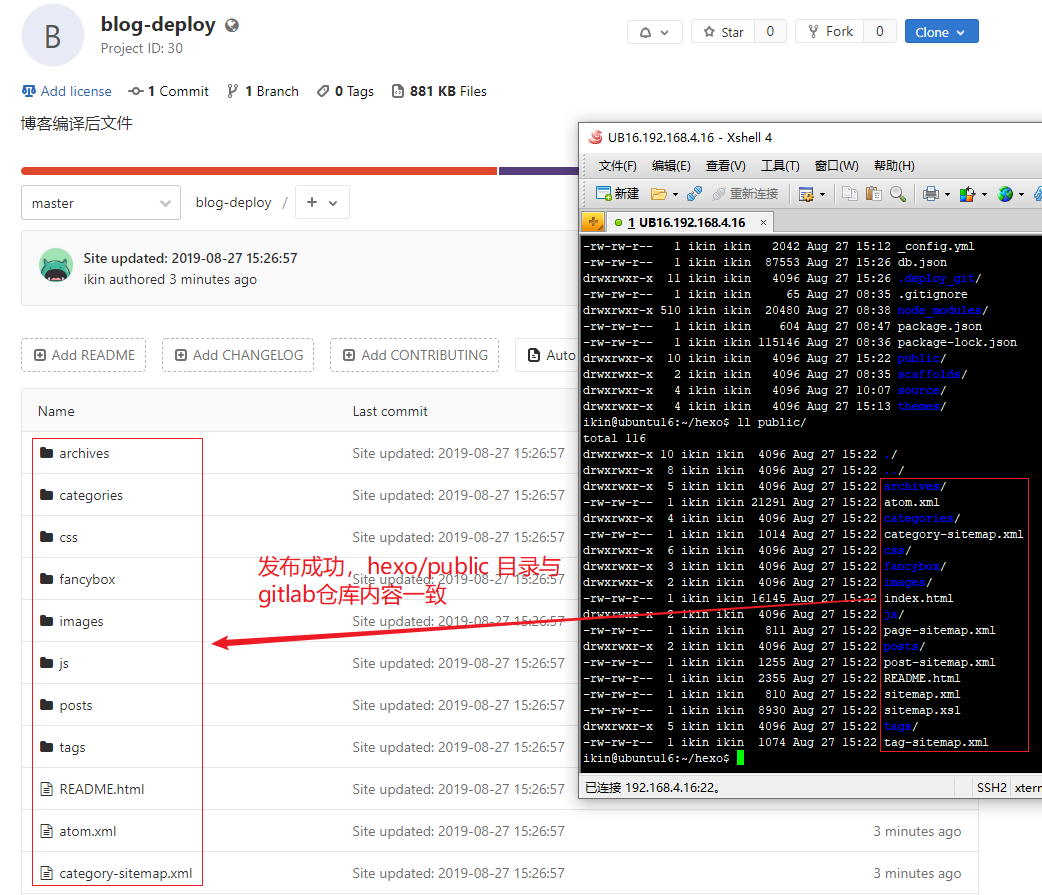
3.1 创建仓库 [C]
在gitlab上创建2个仓库,一个用于存放博客内容,一个用于存放hexo编译后的发布文件
注意:在创建blog-deploy的时候不要勾选 Initialize repository with a README ,不然后面发布会报错
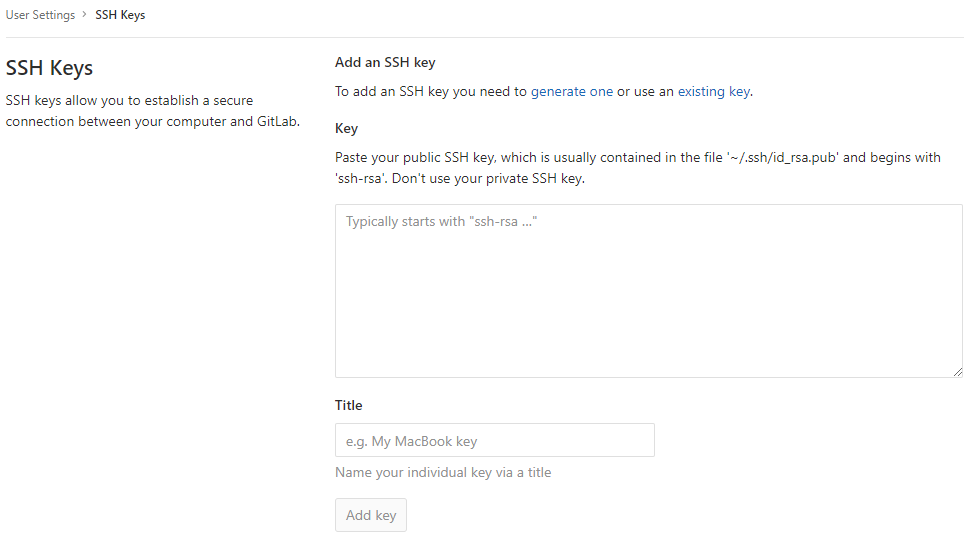
3.2 配置ssh key [A]
查看本机是否已有ssh key
1
2$ cd ~/.ssh
$ cat id_rsa.pub生成 ssh key id_rsa.pub
1
2
3$ ssh-keygen -t rsa -C "[email protected]" #会提示输入密码,这里不要使用密码,都是按回车
# 查看公钥
$ cat ~/.ssh/id_rsa.pub打开gitlab,配置公钥
3.3 配置GIT [A]
1 | $ git config --global user.email "你的gitlab邮箱" |
3.4 克隆仓库 [A]
1 | #删除hexo初始博客文件 |
3.5 配置hexo并推送gitlab [A]
配置_config.yml
1
$ vi ~/hexo/_config.yml
1
2
3
4
5
6
7
8
9
10
11
12
13
14
15
16
17
18
19
20
21
22
23
24
25
26
27
28
29
30
31
32
33
34
35
36
37
38
39
40
41
42
43
44
45
46
47
48
49
50
51
52
53
54
55
56
57
58
59
60
61
62
63
64
65
66
67
68
69
70
71
72
73
74
75
76
77
78
79
80
81
82
83
84
85
86
87
88
89
90
91
92
93
94
95
96
97
98
99
100
101
102
103
104#Hexo Configuration
## Docs: https://hexo.io/docs/configuration.html
## Source: https://github.com/hexojs/hexo/
#Site 博客信息
title: TEC开发中心
subtitle: 知无穷尽,行无止境
description:
keywords:
author: ikin
language: zh-CN
timezone: Asia/Shanghai
#URL
url: http://192.168.4.17:4000
root: /
permalink: posts/:year:month:day-:abbrlink.html
permalink_defaults:
#Directory
source_dir: source
public_dir: public
tag_dir: tags
archive_dir: archives
category_dir: categories
code_dir: downloads/code
i18n_dir: :lang
skip_render:
#Writing
new_post_name: :title.md # File name of new posts
default_layout: post
titlecase: false # Transform title into titlecase
external_link: true # Open external links in new tab
filename_case: 0
render_drafts: false
post_asset_folder: false
relative_link: false
future: true
highlight:
enable: true
line_number: true
auto_detect: false
tab_replace:
#Home page setting
#path: Root path for your blogs index page. (default = '')
#per_page: Posts displayed per page. (0 = disable pagination)
#order_by: Posts order. (Order by date descending by default)
index_generator:
path: ''
per_page: 10
order_by: -date
#Category & Tag
default_category: uncategorized
category_map:
tag_map:
#Date / Time format
## Hexo uses Moment.js to parse and display date
## You can customize the date format as defined in
## http://momentjs.com/docs/#/displaying/format/
date_format: YYYY-MM-DD
time_format: HH:mm:ss
#Pagination
## Set per_page to 0 to disable pagination
per_page: 10
pagination_dir: page
#Extensions
## Plugins: https://hexo.io/plugins/
## Themes: https://hexo.io/themes/
theme: landscape
#Feed Atom
feed:
type: atom
path: atom.xml
limit: 20
#sitemap
sitemap:
path: sitemap.xml
#abbrlink config
abbrlink:
alg: crc32 #support crc16(default) and crc32
rep: hex #support dec(default) and he
# mermaid chart
mermaid: ## mermaid url https://github.com/knsv/mermaid
enable: true # default true
version: "8.2.6"
options: # find more api options from https://github.com/knsv/mermaid/blob/master/src/mermaidAPI.js
#startOnload: true // default true
#Deployment
## Docs: https://hexo.io/docs/deployment.html
deploy:
type: git
repository: ssh://[email protected]:1122/java/blog-deploy.git
branch: master修改主题支持mermaid
下载:https://unpkg.com/[email protected]/dist/mermaid.min.js 保存到 themes/landscape/source/js/
在文件: themes/landscape/layout_partial/after-footer.ejs 底部加入:
1
2
3
4
5
6
7
8<% if (theme.mermaid.enable){ %>
<%- js('js/mermaid.min') %>
<script>
if (window.mermaid) {
mermaid.initialize({theme: 'forest'});
}
</script>
<% } %>发布
1
$ hexo d -g
3.6 配置nginx并发布博客 [A]
配置nginx
1
$ sudo vi /var/local/nginx/nginx.conf
在底部加入:include defined/*.conf;
1
2$ sudo mkdir /var/local/nginx/defined
$ sudo vi /var/local/nginx/defined/ip.conf配置hexo的运行路径
1
2
3
4
5
6
7
8
9
10
11
12server {
listen 4000; #这是容器内的端口
server_name localhost;
access_log /var/log/nginx/ip.access.log;
error_log /var/log/nginx/ip.error.log;
location / {
root /usr/share/nginx/html; #这是容器内的路径
index index.html index.htm;
}
}检查配置是否正常
1
2
3$ docker exec -it nginx nginx -t -c /etc/nginx/nginx.conf
#重启生效
$ docker restart nginx克隆blog-delpoy
1
2$ sudo chown -R 1000:1000 /var/www/hexo/
$ git clone ssh://[email protected]:1122/java/blog-deploy.git /var/www/hexo/这时候可以正常访问nginx的博客:http://192.168.4.17:4000/
3.7 配置Jenkins [B]
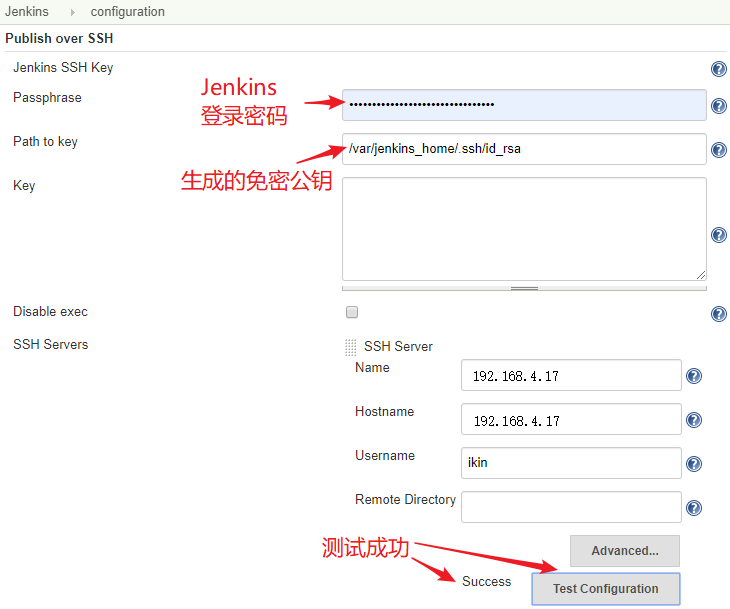
配置免密SSH
1
2
3
4
5
6
7
8
9
10$ docker exec -it jenkins bash
$ ssh-keygen #一直回车即可
#上传公钥到服务器A
$ ssh-copy-id -i ~/.ssh/id_rsa.pub [email protected]
#测试免密登录
$ ssh [email protected]
$ exit #回到容器
$ exit #回到宿主机打开Jenkins并登录,配置Publish over SSH :系统管理->系统设置 最下面
去掉防止跨站点请求伪造
设置->全局安全配置
CSRF Protection
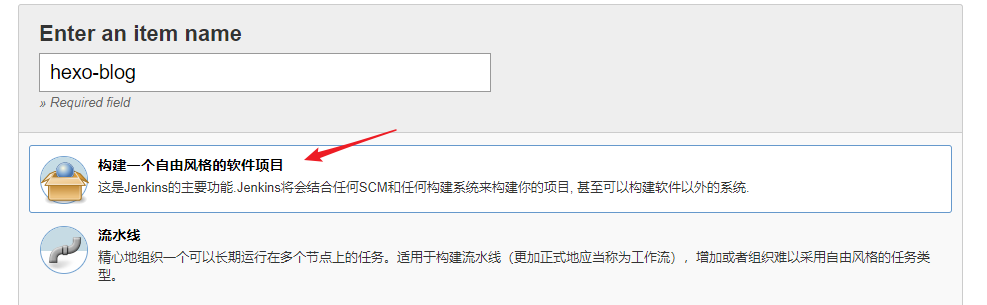
去掉勾选Prevent Cross Site Request Forgery exploits新建任务
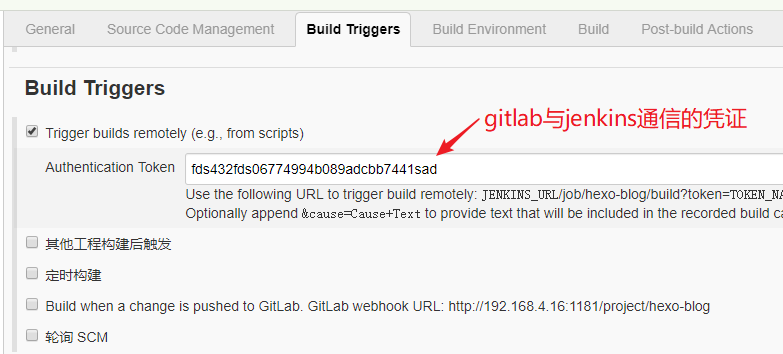
- 配置 Build Triggers
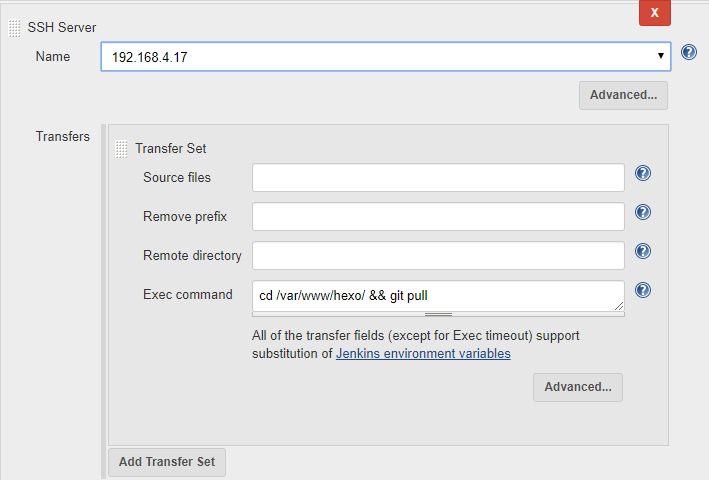
Build添加ssh远程执行命令
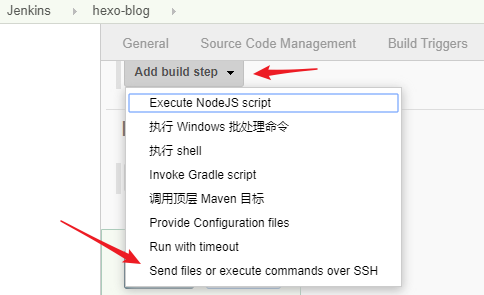
如果没有”Send files or execute commands over SSH”选项,需要先安装publish-over-ssh 插件并配置
拉取最新blog仓库内容并编译发布
1
2
3cd ~/hexo/source/ \
&& git fetch --all && git reset --hard origin/master && git pull \
&& hexo d -g
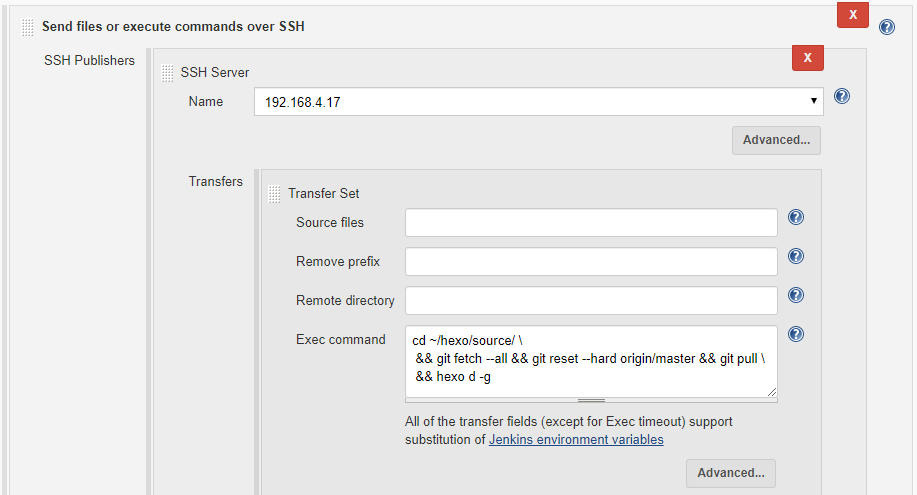
拉取最新blog-deploy仓库
1
cd /var/www/hexo/ && git pull
3.8 配置gitlab webhook [C]
在blog仓库配置webhook,只要有新的提交就触发jenkins任务
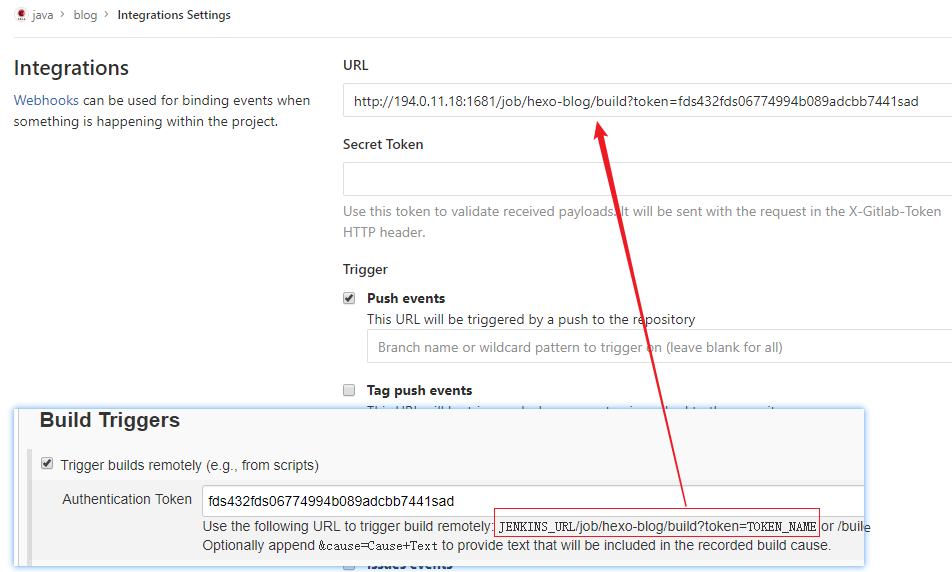
这里的1681是gitlab到jenkins的转发端口,大家按原来的81就可以
4. 编写发布博客(成员PC)
4.1 克隆仓库
1 | $ git clone ssh://[email protected]:1122/java/blog.git |
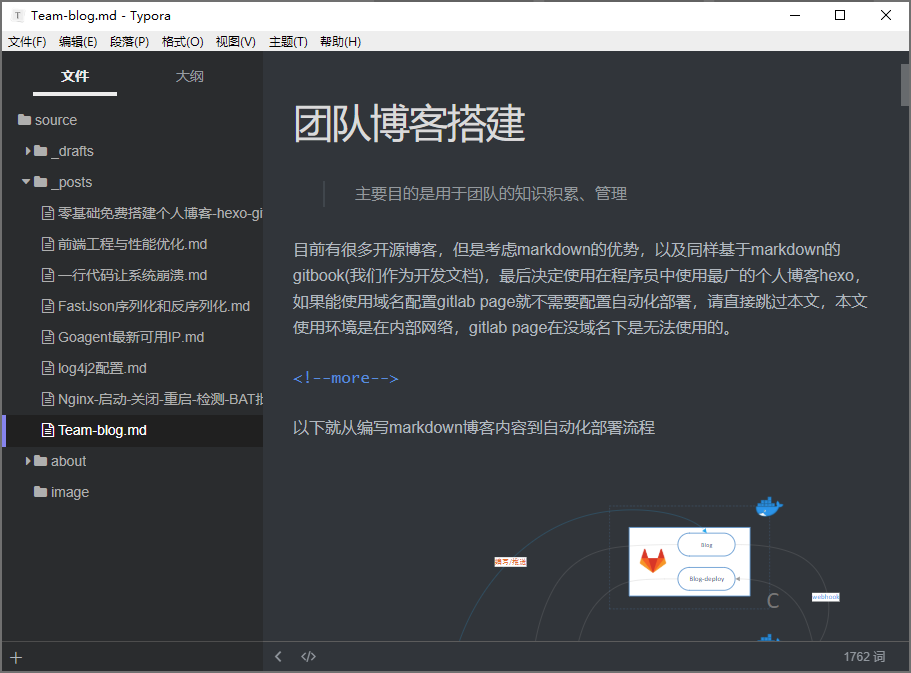
4.2 使用Typora编写博客
4.3 提交并推送到远程仓库
1 | $ git add -A |
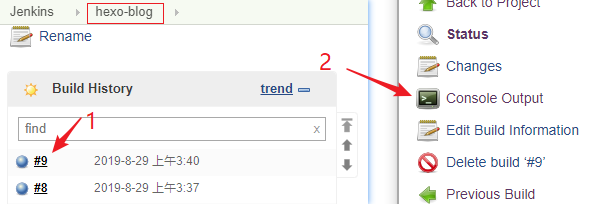
可以打开jenkins查看是否成功触发自动化部署
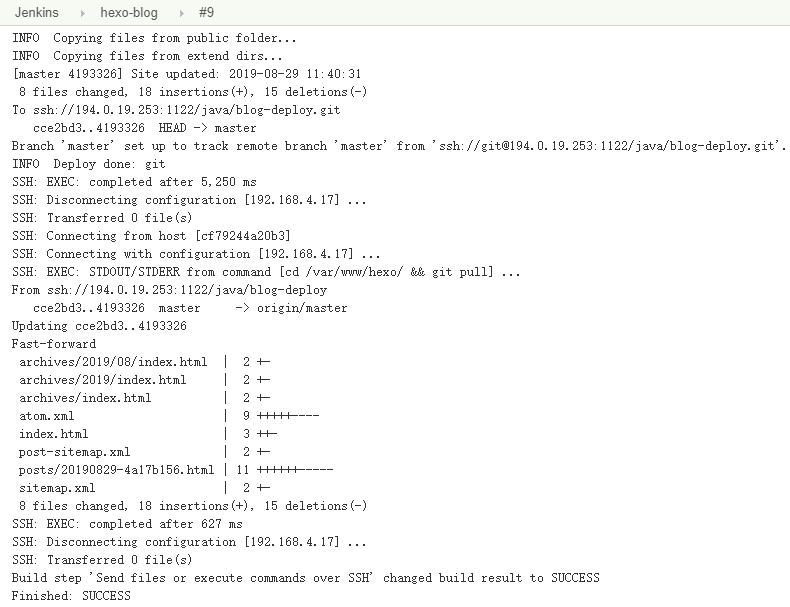
访问 http://192.168.4.17:4000 查看已经自动发布的博客
最后
实际原理就是通过hexo把markdown文件生成静态html页面,然后在nginx下运行,团队的每个成员只要专注于博客的内容编写,不用管博客编译、发布。
如果在github上也有个人博客,只要复制md文件通过hexo或jekyll编译发布到自己的github上即可,甚至可以同时发布到其他支持markdown的平台(简书、微信公众号等),一次编写到处发布。